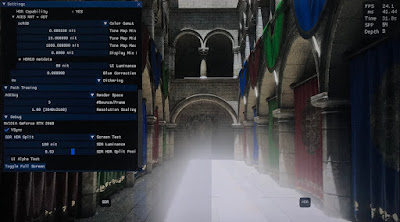
Continue with the DXR Path Tracer in the last post, I updated the demo to support HDR display. It also has various small features updated such as adding per monitor high DPI support, path trace resolution scale (e.g. path trace at 1080, and bilinear upscale to 4K.) and added dithering to tone mapped output to reduce color banding (Integer back buffer format only). The updated demo can be downloaded here.
 |
| A photo of my HDR TV to show the difference between SDR and HDR |
HDR Color Spaces
There are 2 swapchain formats/color spaces can be chosen to output HDR images on HDR capable monitor/TV:
1. Rec 2020 color space (DXGI_FORMAT_R10G10B10A2_UNORM + DXGI_COLOR_SPACE_RGB_FULL_G2084_NONE_P2020)Rec2020 color space is the common HDR10 format with PQ EOTF. But it is recommended to use scRGB color space on Windows. scRGB use the same color primaries at Rec709, which support wide color using negative values. I was confused about using negative values to represent a color (as well as intensity) at first. Because color gamut is usually displayed as CIE xy chromaticity diagram, I used to think of a given RGB value as a color interpolated inside the Red/Green/Blue gamut triangle using the barycentric coordinates.
2. scRGB color space (DXGI_FORMAT_R16G16B16A16_FLOAT + DXGI_COLOR_SPACE_RGB_FULL_G10_NONE_P709)
 |
| A debug chromaticity diagram showing Rec2020 color gamut. Using a HDR backbuffer will show less clipped color |
HDR10 metadata
I have also played around with HDR10 metadata to see how it affects the image. But most of the data does not affect the image on my Samsung UA49MU7300JXKZ TV. The only data have effects on the image is "Max Mastering Luminance" which can affect the image brightness. Setting it to a small value will make image darker despite outputting a very bright 1000 nit image. Also, the HDR10 metadata only works in Full Screen Exclusive mode, or borderless windowed mode with HWND_TOPMOST Z order (I guess is the full screen optimization get enabled), using borderless window with HWND_TOP Z order won't work (but this mode is easier to alt-tab on single monitor set up...). Besides, entering Full Screen Exclusive mode may fail when calling SetFullscreenState() if the display is not connected to the adapter that used for rendering. I didn't notice this until I started to work on laptop which use the RTX graphics card for ray tracing and the laptop monitor is connected to the Intel graphics card. Looks like some hard work need be done in order to support Full Screen Exclusive mode properly (e.g. create a D3D Device/Command Queue/Swapchain and for the Intel graphics card and copy the ray traced image from the RTX graphics to Intel graphics card for full screen swapchain). But unfortunately, my demo does not support multi-adapter, so the HDR10 metadata may not work on such setup (I am outputting to the external HDR TV using the RTX graphics card, so that doesn't create a much problem for me...)...
|
|
UI
Blending SDR UI with HDR image is handled in 2 steps: blend color and then brightness. All the UI is rendered into an off screen buffer (in 8 bit Rec709 color space). And then later blended with the ACES tone mapped image. Take a look at the ACES tone mapping function snippet below, the lighting value will be mapped to a normalized range in AP1 color space as an intermediate step (red part in the below code snippet). So in the demo, the UI in off screen buffer will be converted to AP1 color space and then blend with the tone mapped image at this step. (I have also tried blending in XYZ space and the result is similar in the demo.)
 |
| ACES tone map function snippet |
Then the UI blended image can be transformed into target color space (e.g. scRGB or Rec2020, purple part in the above code snippet). When converting the normalized color data to HDR data, the ACES tone mapper interpolates the RGB values between Y_MIN and Y_MAX (i.e. blue part in the above code snippet). During this brightness interpolation, the demo adjust Y_MAX (e.g. 1000 to 4000 nits) to user defined UI brightness (e.g. 80 to 300 nits) depending on the UI alpha, using the following formula:
In the demo, BlendPow is set to 5 as default value. Although the result is not perfect (e.g. the UI alpha value may not looks blending linearly, depending on background luminance), it works well enough to avoid bleeding though from a bright background with UI alpha > 0.5:
|
|
|
||||||
| Photos showing UI blending with HDR background, from dark to bright. | ||||||||
However, the above blending formula have artifact when Y_MAX is smaller than the UI brightness (But this may not happens and only happens in some debug view mode). In this case, the background may looks too bright after blending with the UI. To fix this, inverting the BlendPow may helps to minimize the artifact:

The below is an extreme example showing the artifact with Y_MAX set to 1 nit and UI set to 80 nit:
|
|

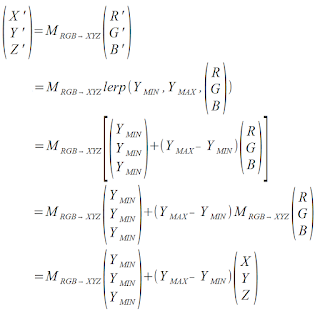
So, interpolating in different display color space do have some differences as long as Y_MIN != 0. But The ACES tone mapper which defaults to use the STRECH_BLACK option which effectively setting Y_MIN= 0, so there should be no difference when interpolating values in difference color space. Out of curiosity, I have tried to disable the STRECH_BLACK option to see whether the image will look different when switching between the scRGB and Rec2020 back buffer with Y_MIN > 0, but the images still looks the same with a large Y_MIN... I am not sure why this happens, may be the difference is too small to be noticeable... In the demo, I take this into account and treat the Y_MIN as a value in the XYZ color space and interpolate the value like this:
Debug View Mode
To help debugging, several debug view modes are added. A "Luminance Range" view mode is used to display the luminance value of a pixel before tone mapping (ie. the physical light luminance entering the virtual camera) and after tone mapping (i.e. the output light luminance the monitor should be displayed):
|
|
A "Gamut Clip Test" mode to high light pixel that fall outside Rec709 gamut, i.e. those color can only be viewed with a HDR display or wide color monitor (e.g. AdobeRGB / P3 monitor).
 |
| Highlight clipped pixel with cyan color |
 |
| A photo showing both SDR and HDR at the same time. Bloom is exaggerated to show the clipped color in SDR |
In this post, I have talked about the color spaces used for outputting to HDR display. No matter which color space format is used (e.g. scRGB/ Rec2020), the displayed image should be identical if transformed correctly (except some precision difference). Also, I have tried to play around with the HDR10 metadata, but most of the metadata does not change the image on my TV... I guess how the metadata is interpreted is device dependent. Lastly, SDR UI is composited with the HDR image by first blending with the color and then brightness. A simple blending formula is enough for the demo. A complicated algorithm can be explored in the future, say brighten up the UI depending on the brightness of a blurred HDR background (e.g. may be storing the background luminance in the alpha channel and blur it together with bloom pass?). A demo can be downloaded here to test on your HDR display (Some of the options are hid if not connecting to HDR display).
References
[1] https://channel9.msdn.com/Events/Build/2017/P4061
[2] https://www.pyromuffin.com/2018/07/how-to-render-to-hdr-displays-on.html
[3] https://www.gdcvault.com/play/1024803/Advances-in-the-HDR-Ecosystem
[4] https://www.gdcvault.com/play/1026443/Not-So-Little-Light-Bringing
[5] https://developer.nvidia.com/implementing-hdr-rise-tomb-raider
[6] https://www.asawicki.info/news_1703_programming_hdr_monitor_support_in_direct3d
[7] https://onedrive.live.com/?authkey=%21AFU3moSbUzyUgaE&cid=A4B88088C01D9E9A&id=A4B88088C01D9E9A%21170&parId=A4B88088C01D9E9A%21106&o=OneUp
[8] https://www.shadertoy.com/view/4tV3WW


